
The objective
of this lesson is to have each student think about and work with causes in
their community or world that they feel strongly about. They will create a
symbol that will represent and advocate for the promotion of that cause and
learn how to create that message using beginning printmaking techniques. This
lesson will have students discuss a cause of their choice with a peer and allow
them to create multiple works of art from it.
Age: This was created for adults but can
be taught to middle school students and older. I would recommend that students
have some background in drawing or feel comfortable doing so for the lesson.

Setting: This lesson needs an open space
where students can sit at a table and have enough room to walk around. The room
will be arranged with printing stations set up with different colors on them.
Students can carve at their seats but also get up to get paper and work at the
print stations. A drying rack or a space to hang or set the prints to dry is
needed. For public schools, the pace can be slowed down over a week. One or two days can be set apart just for
printing.
Special considerations: Depending on the age and maturity
of students the instructor should remind the participants to be sensitive when
discussing other peoples causes. They should be non-judgmental and create an
environment of support. Carving tools are sharp, so safety precautions must be
discussed and followed.
Materials:
Student materials: image from home, journal or paper
for notes/sketch, soft linoleum block (4 x 5 in or larger) several sheets of
paper various colors, printmaking ink (black or various colors), carving tools (enough
for each student), damp sponges to clean fingers, paper towels, brayers (rollers),
paper to cover the tables, wax paper or clear transparency to roll ink on, scissors
and masking tape. Optional: baron, drying rack, tracing paper to transfer
drawings.
Teacher materials: samples prints, materials for
demonstrations and posters.

Activities:
Preparatory activities: Ask students
to find an image that represents an issue that they feel strongly about bring
it to class.
Introductory activities: Welcome and
share the intention of the workshop. Share the image they selected and why. Is
there any experience that influenced the selection of this image?
Think, Pair, Share: With a partner
students will brainstorm and ask, what the world would look like if the issue
was resolved? What symbol would represent what they would want to see in the
world? Students will begin to sketch their ideas in a journal or on a paper.
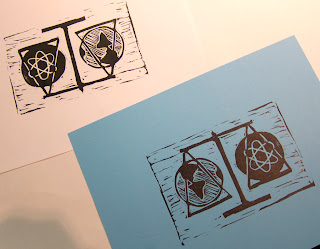
· I will show a few examples (printed
out) of symbols that could represent a cause. We can discuss these focusing on
how they are sending their message. I will let them know at this time to
consider how much positive and negative space they are using and to try to keep
it balanced. Transition into the demonstration on
how to work with linoleum. This includes, explaining how the tools work and
safety using step-by-step posters. Students can take notes in their journals.


 |
| Sample of tool and safety poster |
· Students will sketch an idea of the
symbol that they will print, draw it or transfer it to their linoleum and begin
to carve it. The teacher should carefully monitor this step for safety and to
assist students.
·
Teacher will give a demonstration on
printing the linoleum and reviewing the set up.


The teacher will also review the types of techniques and paper that can be used.
- Rainbow roll- using two color inks on one block. Adding color on the paper then printing on top once it has dried
- Chine-collé- gluing thin paper under the print to add color
- Ghost print- printing repeatedly until the ink fades
Students will being printing


Closing- As a group we will discuss the challenges and successes they had during the workshop. They will describe the symbol that was chosen and share a print that was successful. In order to begin to share the message of their symbol students will select one of the many prints they made and exchanging of a print with each other.
Follow up options- The teacher can demonstrate how to convert the image into a flyer for distribution using Adobe photoshop or other available programs.
·
No comments:
Post a Comment